
The surface of a piece of silver is a canvas. A high polish is one option, certainly, but it’s far from the only one. Texture adds depth, character, and a tactile quality that invites touch. It can hide future scratches, create contrast, and turn a simple form into something complex and intriguing. Learning how to texture silver is a fundamental skill that opens up enormous design possibilities right at the bench.
Down in my workshop in Birmingham’s Jewellery Quarter, I rely on a core set of texturing techniques, from the ancient rhythm of a hammer to the controlled corrosion of acid. This isn’t a theoretical list; these are the methods I use week in, week out. They are proven, practical, and, when done with care, consistently beautiful. What follows is a bench-tested guide to eight of the most useful silver texturing techniques, with notes on the tools you’ll need and the common pitfalls I’ve learned to avoid. We hold ourselves to high editorial standards here, so every tip is based on real-world workshop practice.
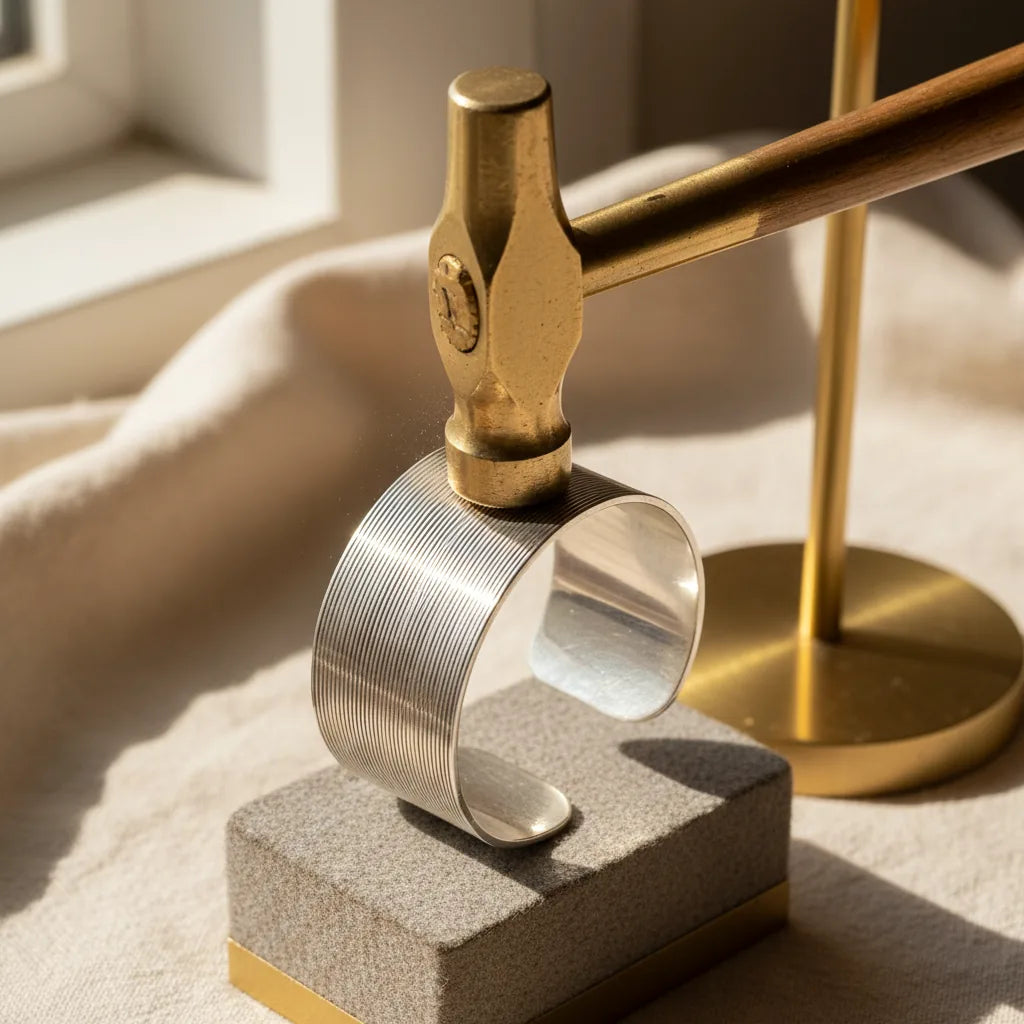
1. Cross-peen Hammering
This is perhaps the quintessential hammered silver texture. It’s honest, direct, and deeply satisfying to create. The cross-peen hammer, with its wedge-shaped face, imparts a series of parallel, linear marks that can look like anything from fine linen to rough-hewn bark, depending on the hammer and the force of the blow.
The beauty of this method is its simplicity. You are physically displacing the metal, and the texture is a direct record of that action. It’s a brilliant way to add a rustic or organic feel to a piece, particularly on wider surfaces like cuffs or flat pendants. By varying the angle and overlapping your strikes, you can create beautifully complex, almost woven patterns.
Tools Needed
- Cross-peen hammer: The face should be polished and free of nicks, as any imperfection will be transferred to your silver. A lighter 4oz (approx. 113g) hammer is good for delicate work, while an 8oz (227g) gives more impact.
- Steel bench block or anvil: A solid, polished surface is essential to support the work.
- Annealed silver: The metal must be soft to receive the texture cleanly without excessive effort. For a refresher, see our guide on how to anneal and forge silver.
Common Mistakes
- Forgetting to anneal: Trying to texture work-hardened silver is a fool's errand. You’ll barely make a mark, and you risk damaging your hammer face and your wrist. Anneal the piece until it glows a dull cherry red, pickle, and rinse before you begin.
- Inconsistent blows: Varying the force of your hammer strikes will result in a patchy, uneven texture. Practice on a piece of copper scrap to find a consistent rhythm and strength. Let the weight of the hammer do most of the work.
- Over-working: It’s easy to get carried away and thin the metal too much in one spot. Hammer methodically, moving across the piece evenly. Remember that every hammer blow is a forging blow; it stretches and thins the sheet.
2. Bullseye & Texture Hammers
While a cross-peen gives you lines, a dedicated texture hammer gives you specific, repeatable patterns. These hammers have designs machined directly into their faces—concentric circles (a bullseye), dimples, stars, or checkerboard patterns. They offer a shortcut to complex patterns that would be tedious to create otherwise.
These are fantastic for creating borders, focal points, or all-over patterns on sheet and wire. A dimple hammer, for instance, can produce a beautiful stippled effect that catches the light from all angles. Unlike a cross-peen, where the goal is often a flowing, organic pattern, these hammers are more about precision and placement.
Tools Needed
- Texture hammer: Fretz and Peddinghaus make excellent ones. Choose a pattern that suits your design aesthetic.
- Steel block or stake: As with any hammering, a rigid, supportive surface is non-negotiable.
- A steady hand: Good alignment is key.
Common Mistakes
- Sloppy placement: Haphazardly striking the metal will look chaotic. It's often better to plan your pattern, sometimes even marking light guidelines on the silver with a pencil or fine marker.
- Uneven strike depth: A common issue is hitting the hammer off-centre, resulting in a partial or lopsided impression. Aim for a clean, flat strike, perpendicular to the metal's surface. A heavier brass mallet can be used to strike the back of the texture hammer for more control if you're using it like a large stamp.
- Ignoring the edges: The pattern often looks best when it runs cleanly off the edge of the piece. Don’t be afraid to texture right to the very border; you can file and clean up the edges afterwards.
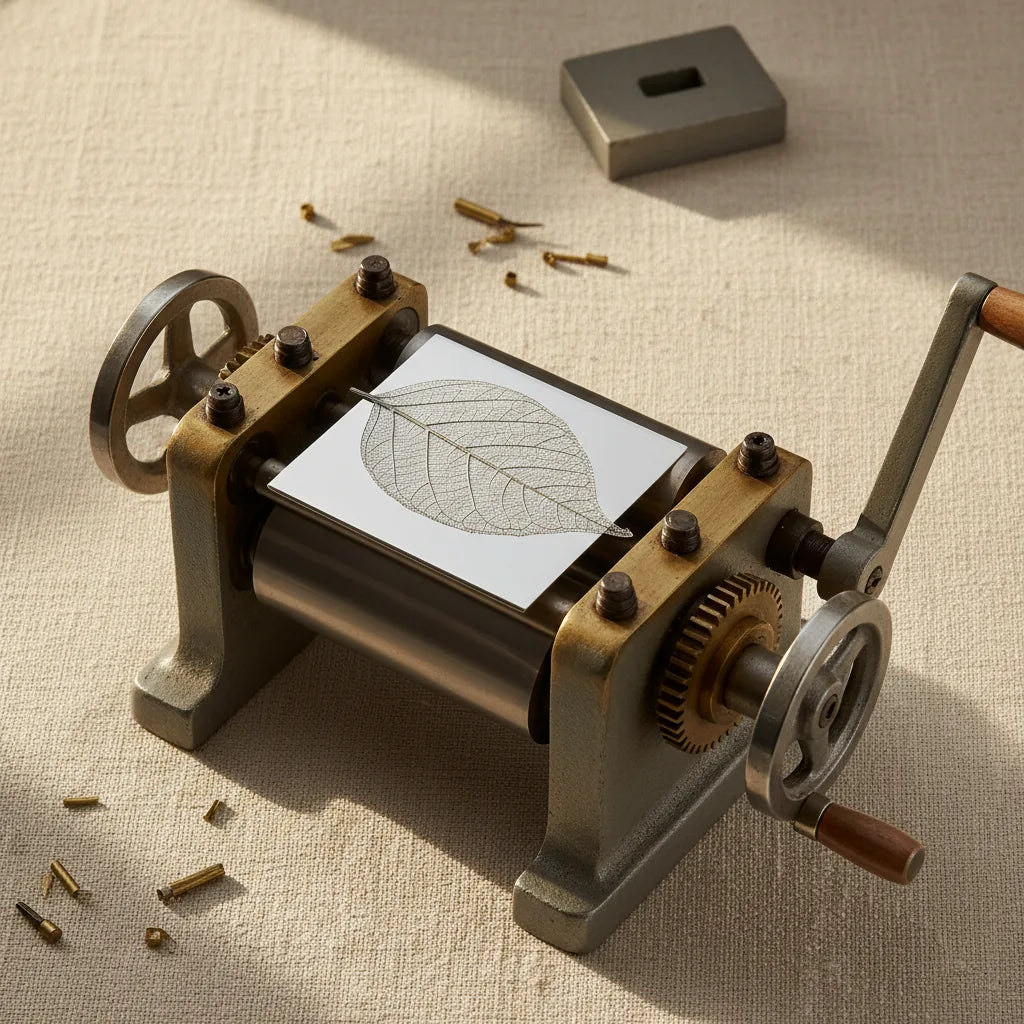
3. Rolling-mill Texture
The rolling mill is a game-changer for texturing sterling silver sheet. This technique works by sandwiching a texture material between two sheets of metal (or one sheet and a piece of card) and passing the "sandwich" through the mill. The immense pressure permanently embosses the texture onto the silver.
The range of possible textures is limited only by your imagination. Dried skeleton leaves, lace, textured wallpaper, brass texture plates, even coarse-grit sandpaper can produce stunning results. It’s an incredibly efficient way to texture a large sheet with a perfectly uniform pattern, ideal for production work or creating matched pairs for earrings.
Tools Needed
- Rolling mill: This is a significant workshop investment, but indispensable for many jewellers.
- Texture material: Must be thin, dry, and relatively robust. Brass texture plates are reusable and give a crisp impression.
- Annealed silver sheet: 0.8mm to 1.2mm is a good thickness to start with.
- Brass or copper "pusher" sheets: Often, you'll sandwich your silver and texture plate between two softer sheets of brass to protect your mill rollers.
Common Mistakes
- Setting the gap too tight: This is the cardinal sin. You’ll shred your texture material, excessively thin your silver, and put immense strain on your mill. Start with the rollers wide open and gradually tighten them until you feel them "bite" the metal sandwich. Do a test run on copper first.
- Using damp materials: Any moisture in organic materials like leaves or paper will be driven into the surface of the silver under pressure, potentially causing staining or a poor impression. Ensure everything is bone dry.
- Misalignment: If the sandwich isn't fed in straight, the texture can skew. Guide it in carefully with both hands.
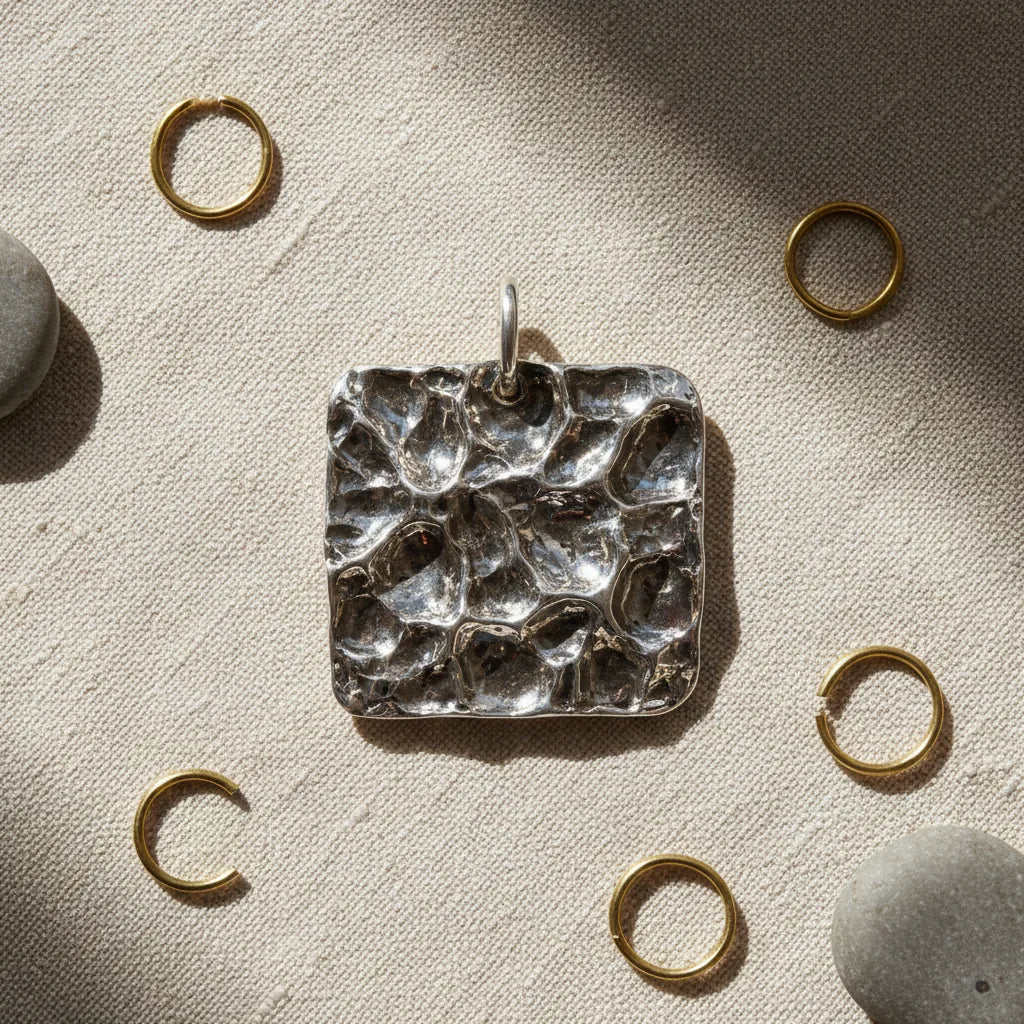
4. Reticulation
Reticulation is a heat-controlled process that creates a wrinkled, organic, moon-like surface. It feels almost alchemical. The effect is achieved by repeatedly heating a special alloy of silver until the lower-melting-point core metal (copper) begins to melt and pull away from the higher-melting-point fine silver skin that forms on the surface.
This is not a technique for precise, repeatable patterns. Every piece will be unique. Reticulated silver has a dramatic, sculptural quality that works wonderfully for one-of-a-kind statement pieces. While special reticulation silver (typically 82% silver, 18% copper) gives the most dramatic results, a similar, more subtle effect can be achieved on standard sterling silver with careful heating.
Tools Needed
- A large, bushy flame: A standard jeweller's torch with a large nozzle, or a Sievert or Smith's Little Torch with a multi-flame rosebud tip. You need to heat the whole piece evenly.
- Reticulation or sterling silver sheet: At least 1.2mm thick is recommended, as thinner sheet can easily melt completely.
- Fire bricks or a charcoal block: A surface that can withstand prolonged, high heat.
Safety First
Reticulation involves bringing silver to the very brink of its melting point (and sometimes beyond).
- Ventilation is critical. The process can produce fumes. Work in a well-ventilated area or use extraction.
- Wear safety glasses. Always. No excuses.
- Keep a quench bowl of water nearby, but be aware that plunging a near-molten piece of metal into water can produce a dangerous amount of steam. Let it air cool for a few moments first.
Common Mistakes
- Meltdown: The line between a perfect reticulation and a puddle of silver is incredibly fine. Keep the torch moving constantly and watch for the surface to shimmer and ripple. As soon as you see the effect you want, pull the flame away instantly.
- Uneven heating: Focusing the flame on one spot will cause it to melt while the rest of the piece remains unaffected. The goal is to bring the entire piece up to temperature simultaneously.
- Giving up too early: For sterling, the process involves repeatedly heating the piece to build up a thick layer of fine silver on the surface (depletion gilding). You heat it until it blackens with oxides, pickle it clean, and repeat 5-10 times before the final reticulation heat. Skipping this step will result in a poor effect.
5. Ferric Chloride Etching
Etching uses a chemical corrosive (a mordant) to eat away at unprotected areas of silver, leaving a recessed, matte-textured design. It’s a fantastic way to transfer intricate, drawing-like patterns onto metal. You can create a "resist" (a protective layer) using everything from a permanent marker pen for a hand-drawn look, to laser-printed toner transfers (PnP paper) for photographic detail.
The resulting texture is a frosted, slightly crystalline surface in the etched areas, which provides a beautiful contrast to a polished, raised design. It's a versatile technique for adding custom patterns, logos, or even text.
Tools Needed
- Ferric Chloride: It’s less aggressive than nitric acid, making it a safer choice for a workshop.
- Resist material: PnP (Press-n-Peel) blue film, permanent ink markers (Sharpie is a classic), or specialist asphaltum varnish.
- Plastic or glass container: Ferric chloride will attack most metals, so never use a steel or copper tray.
- Prepared silver sheet: The surface must be impeccably clean and grease-free for the resist to adhere properly.
Safety Notes
Even though it's safer than other acids, Ferric Chloride is still a corrosive.
- Wear nitrile gloves and safety goggles.
- Work in a well-ventilated space.
- Neutralise used acid before disposal. Check your local council's guidelines for chemical waste disposal. A solution of bicarbonate of soda can be used to neutralise small amounts.
Common Mistakes
- A poor resist: If the resist isn't properly applied or has gaps, the acid will seep underneath (undercutting) and ruin the crisp edges of your design. For PnP paper, a household iron or heat press must be at the right temperature to ensure a complete transfer of the toner.
- Leaving it too long: The longer you etch, the deeper the bite. Check the progress every 10-15 minutes. Leaving it for hours can eat right through thin sheet.
- Not agitating: The acid touching the metal becomes exhausted. Gentle agitation (rocking the tray or suspending the piece) ensures fresh acid is always in contact with the surface, resulting in a more even etch.
6. Sand-blasting / Bead-blasting
This is a purely mechanical surface treatment that produces a wonderfully uniform, matte finish. A sand-blasting cabinet uses high-pressure air to propel a fine abrasive (the media) at the silver. It’s less about creating a deep pattern and more about establishing an overall surface quality.
Glass beads produce a soft, satin sheen, while more aggressive media like aluminium oxide gives a coarser, more matte finish. The real power of blasting comes from using it selectively. By masking off areas with heavy-duty tape or stencils, you can create sharp-edged contrasts between a matte, blasted surface and a high-polish one.
Tools Needed
- Blasting cabinet: A self-contained unit is essential for safety and to reclaim the media.
- Air compressor: A decent-sized compressor is needed to provide consistent pressure (around 80-100 PSI).
- Blasting media: Glass beads (80-120 grit) are a good all-rounder for jewellery.
Common Mistakes
- Uneven coverage: It’s easy to miss spots. Hold the piece with tweezers and rotate it methodically under the stream of media to ensure you cover it from all angles.
- Contaminated media: Any oil or grease that gets into the media will be blasted onto your piece, causing finishing problems later. Keep the cabinet clean.
- Warping thin metal: The force of the blast can distort very thin or delicate pieces. Use lower pressure and be gentle.
7. Planish + Scratch Finish
Not all textures need to be dramatic. Sometimes, a subtle, hand-applied finish is exactly what a piece calls for. This is one of my favourite silver surface texture methods because it's so controlled. The process starts by using a planishing hammer to create a smooth, multi-faceted surface. The goal isn't to flatten the metal, but to cover it in tiny, seamless facets that reflect light beautifully.
From this perfectly smooth, planished base, you can introduce a controlled scratch finish. Using abrasive papers, wire brushes, or texturing wheels in a pendant motor, you can create anything from a silky, satin finish (using fine, multi-directional scratches) to a bold, linear "brushed" finish (using a coarser abrasive in one consistent direction).
Tools Needed
- Planishing hammer: Must have a mirror-polished, slightly domed face.
- Polished steel stakes: A variety of shapes to support the piece you're planishing.
- Abrasives: 3M Trizact papers (from 400 to 3000 grit) are excellent for subtle finishes. Coarser emery paper or brass/steel wire brushes for more aggressive textures.
Common Mistakes
- Scratches on the hammer: A planishing hammer must be treated with respect. Any ding or scratch on its face will be diligently transferred to every piece you ever hit with it. Keep it protected and polish it regularly. Our guide on choosing your first jeweller's hammer goes into more detail on hammer care.
- Inconsistent direction: For a brushed finish, consistency is everything. Any stray scratches going against the grain will stand out. Brace your hand and make deliberate, parallel strokes.
- Pressing too hard: Let the abrasive do the work. Applying too much pressure creates deep, ugly gouges rather than a fine, uniform texture.
8. Stamp Impressions
Stamping is a direct and effective way to apply a repeating pattern or motif. Unlike texturing hammers, which are swung, steel stamps are held in place and struck with a separate hammer. This gives you much more control over placement. The technique is identical to hallmarking, which you can read about in our guide to maker's mark stamping.
You can buy stamps with thousands of designs—from simple dots and lines to intricate floral or geometric patterns. You can arrange them to create borders, mandalas, or random, scattered patterns. It’s a technique that bridges the gap between a fully hammered texture and a more graphic, applied design.
Tools Needed
- Steel design stamps: Made from hardened tool steel (often Sheffield steel, HRC 58-62).
- A heavy hammer: A 1lb (450g) brass mallet or a solid steel hammer is ideal. You need weight and a single, confident strike.
- A very solid surface: A thick steel block on a sturdy bench is the minimum. An anvil or a dedicated stamping post is even better.
Common Mistakes
- Double-striking: The dreaded "ghost" impression. This happens when the stamp bounces or shifts slightly upon impact, creating a faint second image. The key is a single, dead-blow strike. Don't be timid.
- Uneven impressions: This comes from not holding the stamp perfectly perpendicular to the metal. The impression will be deeper on one side than the other. Practice holding the stamp straight and steady.
- Poor layout: It pays to plan your design. Use a fine-tip marker to lay out a grid or path for your stamps to follow. For a circular pattern around a ring, a compass or divider can help you space the impressions evenly.
Exploring these different approaches to texturing will add a rich vocabulary to your design work. Each method has its own voice and character. The best way to learn them is to get a piece of scrap copper and play.
If you're looking to get started with hammering or forging, a good place to begin is with our Hammers & Forming collection, and for more graphic work, you'll find what you need in the Punches & Stamps collection.