
There are few techniques that feel as ancient or as transformative as coaxing a three-dimensional form from a flat sheet of metal. It feels like alchemy. But the process of repoussé and chasing isn't magic; it's a methodical, rhythmic dialogue between metal, tool, and hand. It’s a skill that built empires and decorated cathedrals, and much of the ornate Victorian silver that came out of my home city of Birmingham was shaped by these very techniques. If you're looking for a practical guide to repousse for beginners, you've come to the right place. Forget the mystique. This is a craft of patience, not of secrets, and it's more accessible than you might think.
From my bench, the most common misconception is that this is a process of brute force. It isn't. It's about persuasion. You're not beating the metal into submission; you're guiding it, allowing its own crystalline structure to stretch and compress. This guide will walk you through the core principles, the essential tools, and a simple first project to get you started.
Repoussé vs. Chasing: The Fundamental Rhythm
The first thing to get straight is that "repoussé" is not a catch-all term. It's one half of a partnership. The full name of the game is chasing and repousse, and understanding the difference is the key to the whole process.
-
Repoussé (from the French repousser, "to push up") is the work done from the back of the metal. This is where you create the major volumes and forms of your design. You place your sheet face-down in the pitch and use blunt, smooth tools to press the metal outwards, creating bumps and reliefs that will be visible from the front. Think of it as the broad-strokes, blocking-in phase of a sculpture.
-
Chasing (from the French chasser, "to chase") is the work done from the front. This is the refining and detailing stage. You turn the piece over, bed it face-up in the pitch, and use finer, sharper tools to define outlines, sharpen edges, flatten backgrounds, and add texture. This is where the design gains its clarity and character.
You will constantly move between these two states—working from the back, then the front, then the back again—annealing the metal in between to keep it soft and workable. This dance between pushing and refining is the fundamental rhythm of the craft.
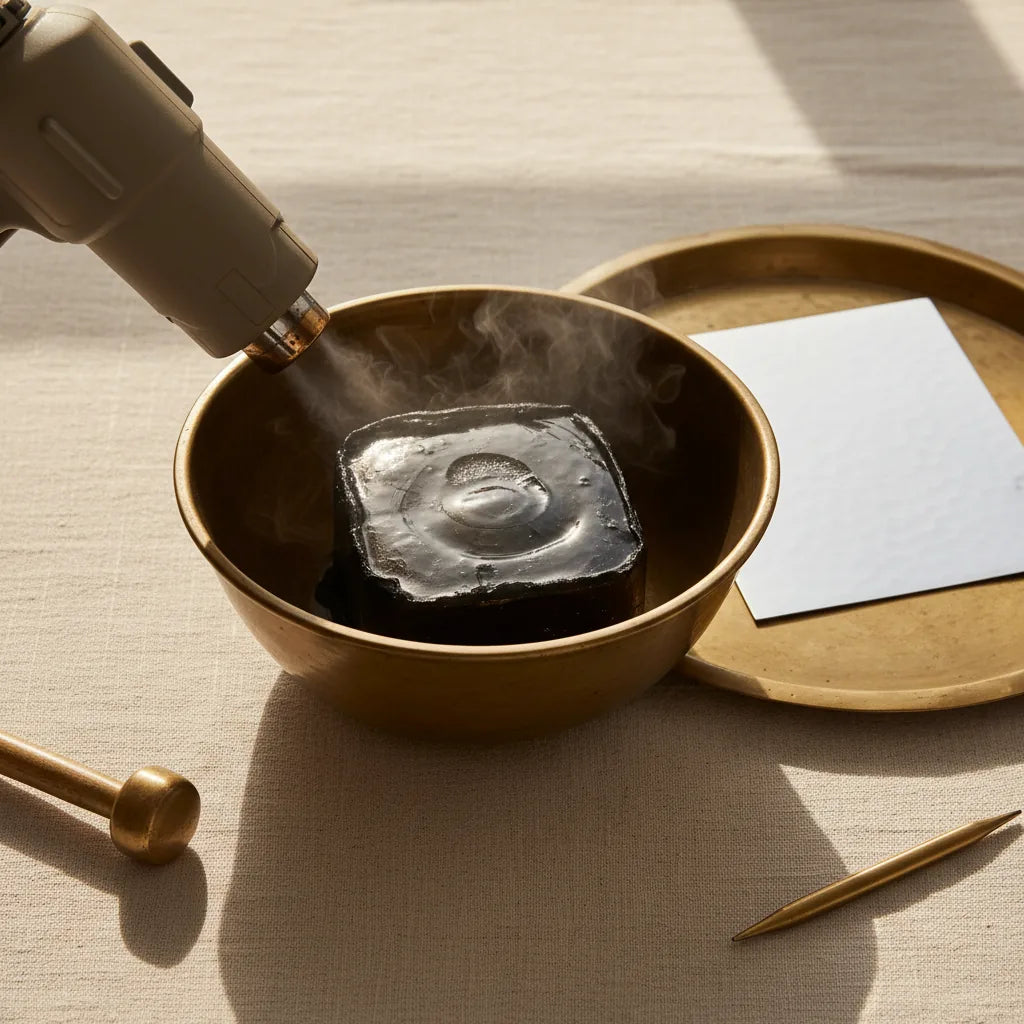
Your Essential Ally: The Pitch Bowl
You cannot do this work without a pitch bowl. There is no substitute. The pitch provides a unique support: it's solid enough to resist the force of your hammer blows, yet yielding enough to allow the metal to be pushed into it. It holds your work securely while you hammer away, and a gentle application of heat is all it takes to release it.
The bowl itself is a heavy, cast-iron hemisphere, typically 150mm or 200mm in diameter. Its weight is its virtue, providing a stable base that won't skip across your bench. It sits in a leather or rubber ring, which allows you to tilt the bowl to any angle, ensuring you can always address the metal with your punch at a perfect 90-degree angle.
The pitch is a thermoplastic compound, traditionally made from bitumen, plaster of Paris, and a little tallow or linseed oil. These days, most of us buy it ready-made. The standard is a black, medium-grade chaser's pitch which works well for most silver and copper work. It's brittle when cold, but softens to a plastic, supportive state with gentle heat.
Setting Up Your Pitch Bowl
Preparing the pitch is a job you only need to do once in a blue moon, but it must be done with care.
Safety first: Good ventilation is non-negotiable. Hot pitch releases fumes you don't want to be breathing in an enclosed space. Open a window or use an extractor.
- Warm the Bowl: Place the empty cast-iron bowl on a heatproof surface. Gently warm the bowl itself with a heat gun (a standard 1500W painter's heat gun is ideal). Don't make it scorching hot; you just want to take the chill off to prevent the hot pitch from cracking on contact.
- Add Pitch Chunks: Break your block of pitch into golf-ball-sized chunks and place them in the warm bowl.
- Melt Slowly: Direct the heat gun onto the chunks, moving it constantly. The pitch will start to melt and slump. Go slowly. If you heat it too fast, you'll create a hard, burnt crust and a soup of bubbles underneath. The goal is an even, slow melt until the bowl is about 80% full.
- Level and Cool: Once melted, you can gently tilt the bowl to level the surface. Then, leave it to cool completely. This can take several hours. The final surface should be smooth and black.
Embedding and Removing Your Work
To secure your metal, gently warm the surface of the pitch with the heat gun until it becomes glossy and slightly soft. Don't melt it into a pool. Lightly warm your metal blank as well—this helps it adhere properly. Press the metal firmly into the softened pitch, ensuring there are no air pockets trapped underneath. Let it cool for 10-15 minutes until the pitch is completely hard again before you start work.
To remove the piece, just reverse the process. Wave the heat gun over the metal. As the metal heats and expands faster than the pitch, it will often pop loose on its own with a satisfying tick. Lift it out with tweezers (it will be hot) and set it aside. The residual pitch can be cleaned off with a rag dipped in white spirit.
The Tools of the Trade
Beyond the pitch bowl, your main tools are a specific hammer and a family of hardened steel punches. Quality here matters. Good tools, made from properly hardened Sheffield steel, will hold their polished faces for years, transferring a clean, crisp mark to your metal.
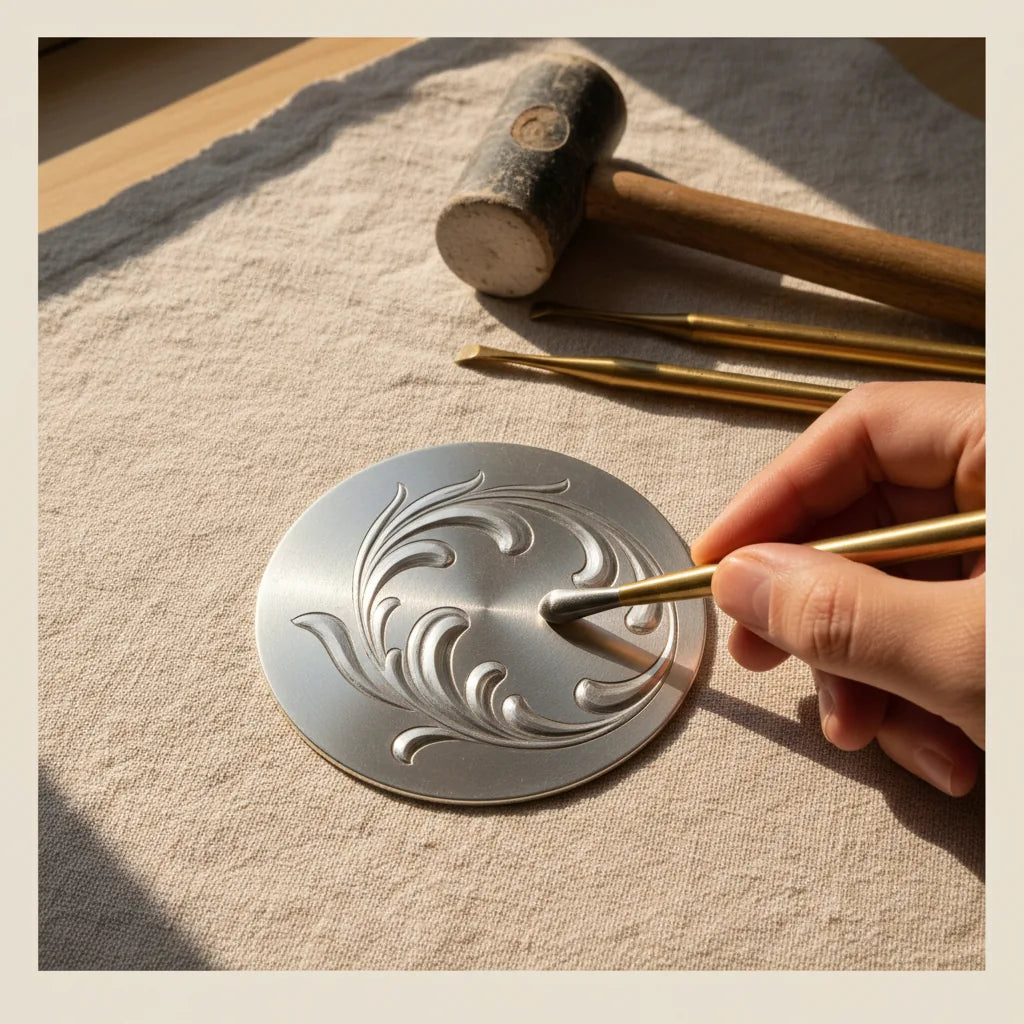
The Chasing Hammer
This is not just any hammer. A chasing hammer has a very particular design for a very particular job. The handle is thin and flexible, swelling into a bulb at the end that fits into your palm. You grip it lightly with your fingers, allowing the handle to pivot in your hand. The head has one large, perfectly flat and polished face for striking your punches, and a small ball pein on the other side for texturing or riveting.
The power comes not from your arm, but from a flick of the wrist. It’s a light, staccato tapping action, delivering dozens of controlled blows per minute. You can learn more about the nuances of different bench hammers in our guide to choosing your first jeweller's hammer.
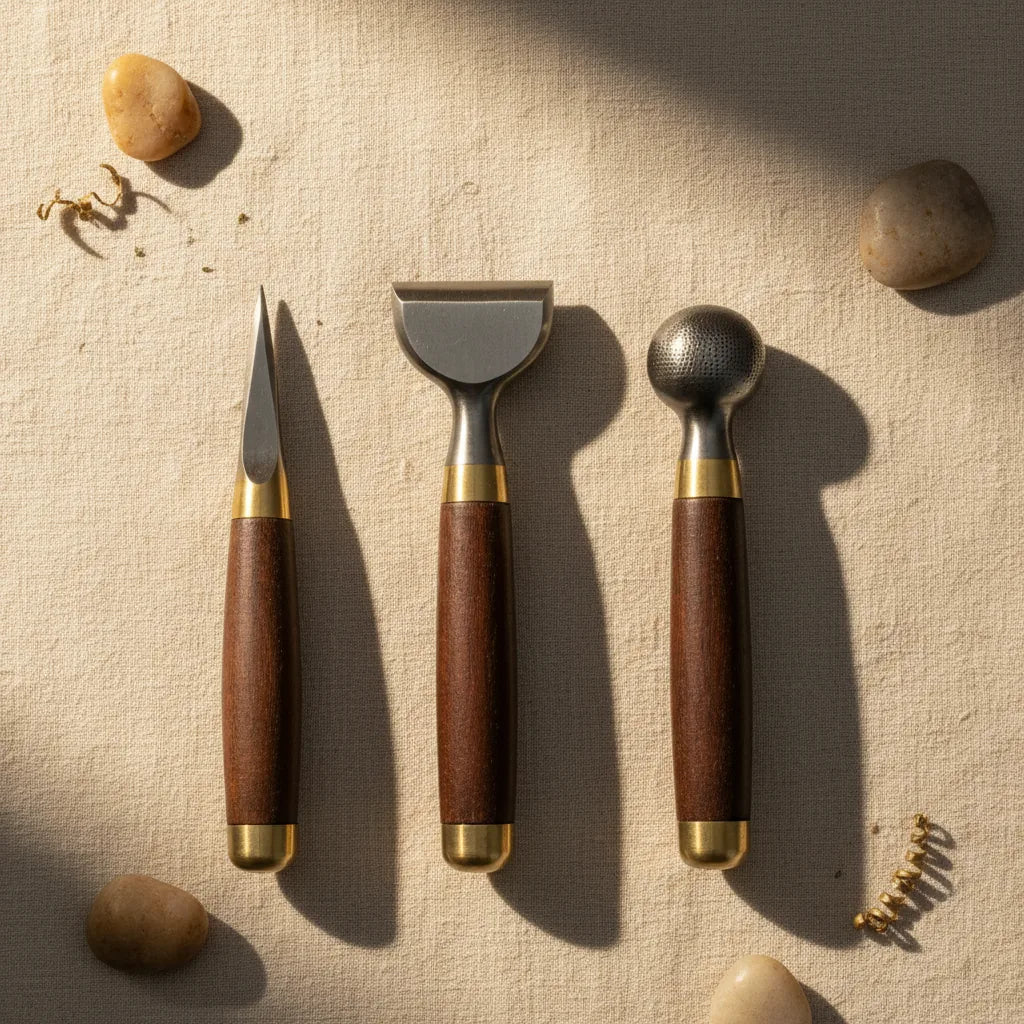
The Chasing Tools (Punches)
These are the real heart of the chasing tools jewellery kit. A full set can run to hundreds of specialised shapes, but a beginner can achieve a huge amount with a basic family of four types. These are available in our Punches & Stamps collection.
- Liners: These have a thin, straight or curved face, like a blunt chisel. They are used from the front to chase the initial outline of your design into the metal. A crisp line from a liner gives you a clear guide to follow when you flip the piece over to begin the repoussé work.
- Modellers & Pushers: These are smooth, often oblong or pear-shaped tools used for the heavy lifting of repoussé. Working from the back, you use these to push out the broad areas of your design, creating the main volume. Their smooth, polished faces ensure they don't mar the metal.
- Planishers: These have flat or very gently domed, highly polished faces. Their job is twofold. From the front, they are used to flatten and smooth the background around your raised design, making it recede. They can also be used on the raised areas to smooth out any bumps left by the modelling tools.
- Matters & Texturing Tools: These punches have a pattern or texture on their face—stipples, lines, cross-hatching. They are used last, almost always on the background, to create a contrasting matte finish that makes the polished, raised design pop. This is just one of many ways to add finish to your work, as we cover in our guide to how to texture silver.
The Working Process: A Step-by-Step Rhythm
Now, let's tie it all together. The repousse technique is an iterative cycle of annealing, working from one side, annealing, and working from the other.
Annealing: The Golden Rule
As you hammer metal, its crystal structure compresses, and it becomes hard and springy—this is called work-hardening. If you continue to work it in this state, it will eventually crack. Annealing is the process of heating the metal to relax that crystal structure, making it soft and malleable again.
For sterling silver, you need to heat the piece in a darkened room with a gas torch until it glows a faint, dull cherry red. Once it reaches that temperature, quench it in water, then place it in a warm pickling solution (like Safety Pickle) to remove the firescale that forms on the surface. You must anneal frequently. How do you know when? The metal will tell you. You’ll feel it become resistant, and the sound of the punch will change from a dull thud to a sharper, higher-pitched tink. That's your cue to stop, remove, clean, and anneal. Learning how to do repousse silver is largely about learning this rhythm.
Transferring Your Design
Before you start, you need your design on the metal. For a beginner, the simplest method is to draw directly onto the annealed metal surface with a fine-tipped permanent marker, like a Sharpie. It’s quick, easy, and any remaining ink will burn off during the next annealing.
The Order of Operations
Here is the fundamental workflow for a simple piece:
- Preparation: Anneal your metal sheet (a 0.8mm or 1.0mm sterling silver or copper disc is perfect). Transfer your design to the front surface.
- Embed (Front Up): Warm the pitch and embed your disc with the design facing you. Let it cool completely.
- Chase the Outline: Select a fine liner tool. Holding it perpendicular to the metal, use your chasing hammer to tap a clean, continuous line following your design. This creates a guideline on the front and a clear "ghost" image on the back.
- Remove, Clean, Anneal: Heat the piece to release it from the pitch. Clean off the residue with white spirit. Anneal the metal to soften it for the next stage. Pickle and rinse.
- Embed (Back Up): Warm the pitch and embed the disc with the back of the piece facing you. You should be able to see the ghost of your chased lines clearly.
- Repoussé the Volumes: Using smooth modelling tools, start working within those ghosted outlines. Gently tap the tool, moving it continuously to push the metal up (which will be down, into the pitch). Work from the centre of a shape outwards towards your lines. Don't try to achieve the full depth in one pass.
- Remove, Clean, Anneal: Once you've raised the main forms, repeat the removal and annealing process. This is a good time to inspect your work from the front and see how the form is developing.
- Embed (Front Up): Embed the piece front-side up again.
- Chase and Refine: Now the real artistry begins. Use your liners to sharpen the outlines again. Use small planishers to smooth the surfaces you raised. Use larger planishers to flatten the background, making the design stand out in sharp relief. Use matting tools to add texture.
- Repeat: For a complex piece, you may repeat this entire cycle—anneal, work the back, anneal, work the front—several times, achieving greater depth and refinement with each pass.
A Beginner's First Project: The Repoussé Leaf
Theory is one thing, but muscle memory is built at the bench. Let's apply this to a simple, classic project: a single leaf on a 32mm copper disc of 0.8mm thickness.
- Anneal and Draw: Anneal your copper disc. With a marker, draw a simple leaf shape on the front: a central vein and an almond-shaped outline.
- First Chase (Front): Embed the disc front-up. Use a liner to chase the outline and the central vein. Don't hit too hard; you just want a clear, indented line.
- Remove, Clean, Anneal.
- First Repoussé (Back): Embed the disc back-up. You'll see the raised lines from your chasing. Select a small, oblong modelling tool. Work on one half of the leaf, pushing the area between the outline and the central vein down into the pitch. Then do the other half. You are creating the two rounded lobes of the leaf.
- Remove, Clean, Anneal.
-
Final Chase (Front): Embed the disc front-up for the last time. Your leaf should now have a pleasing, low-relief volume. Your job now is to refine it.
- Go over the outline and central vein again with your liner to sharpen them.
- Use a small, flat planisher to gently tap down the background all around the leaf. This simple step will make the leaf appear to lift off the surface dramatically.
- For a final touch, take a matting punch with a stippled texture and carefully work over the entire background, creating a frosted finish that contrasts beautifully with the smooth, burnished leaf.
Once you're done, you can drill a hole and make it a pendant, or solder on a pin back. And don't forget to add your maker's mark; it's a piece you should be proud of. If you're new to hallmarking, our guide to maker's mark stamping is a good place to start.
This craft is a journey. It rewards a light touch, a patient mind, and an attentive ear. You learn to listen to the sound of the hammer, to feel the metal yield or resist, and to know when it's time to light the torch. It connects you to a long line of artisans who have shaped precious metal in just this way for centuries.
The essential hammers, punches, and forming stakes for this work are all tools we use ourselves. You can browse our curated selection in the Hammers & Forming collection.
Our articles are written and reviewed by working jewellers to ensure technical accuracy and bench-tested advice, as per our editorial standards.