
The leap from a college workshop to your own space is a daunting one. The temptation is to either buy a complete, pre-packaged kit of questionable quality, or to spend a fortune on tools you won't touch for a year. Both are mistakes. A solid jewellery bench setup isn't about having everything; it's about having the right things. It’s the foundation of your craft, your efficiency, and frankly, your physical wellbeing.
As a jeweller working out of Birmingham, I've seen countless students and makers start out. The ones who succeed build their toolkit thoughtfully. This guide is my bench-tested advice for getting your first jewellery bench UK setup right from day one, focusing on tools that earn their keep and a workspace that won't break your back or your bank.
The Bench Itself: More Than Just a Table
Before you buy a single file, consider your bench. A proper jeweller's bench is higher than a standard desk, typically 95cm to 100cm from the floor to the work surface. This height is for posture. It allows you to sit upright, with your feet flat on the floor and your elbows at roughly a 90-degree angle when your forearms are resting on the bench. Your face should be a comfortable 12-15 inches from your work, not hunched over it.
You don't need to spend £800 on a brand-new Durston bench immediately. A solid, second-hand wooden desk or workbench is a fine start. I started on my grandad's old writing bureau. The key is sturdiness—it can't wobble when you're filing or hammering. If it's too low, raise it securely on solid wood blocks. An adjustable chair is your best friend here; a simple draughtsman's chair will give you the height range you need.
The defining features of a jeweller's bench are the semi-circular cutout and the skin—a leather or canvas sling underneath to catch filings and dropped stones. You can make these modifications yourself with a jigsaw and a piece of canvas, but for your first setup, they are a luxury, not a necessity. A clean, organised floor and a habit of sweeping up your lemel (scrap metal dust) will do the job.
Bench Essentials: The Non-Tool Trinity
Your complete jewellery workshop setup UK relies on three things that aren't cutting, shaping, or hitting tools: your peg, your surface, and your light. Get these right, and every other task becomes easier.
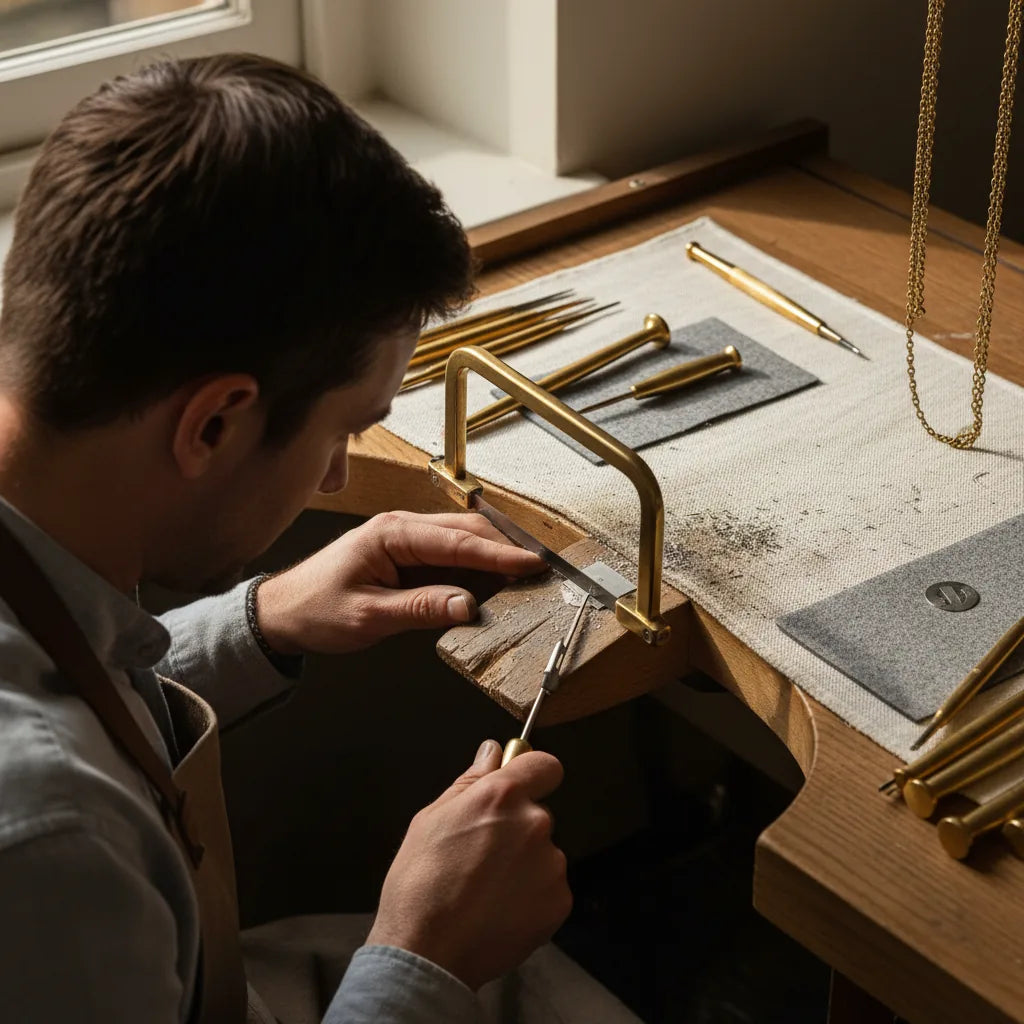
1. The Bench Peg
The peg is the heart of your bench. It's an anvil, a support, and a third hand. It's where you'll do 80% of your sawing, filing, and carving. A standard beech peg is the way to go. You'll file and saw into it, shaping it to your needs over time. A simple, robust G-clamp style peg holder is perfect for a beginner. It lets you attach the peg securely to your desk without permanent modification and can be removed when you need a flat surface. Don't buy a cheap, flimsy one; the peg needs to be rock-solid.
2. Surface Protection
You will spill flux, drop hot solder, and miss with a hammer. Your bench top will suffer. A simple sheet of 1.5mm mild steel, about 30cm square, will save it. It acts as a soldering surface (on top of a fire brick, of course), a place to hammer against, and a general shield. You can get an offcut from a local metal fabricator for less than £20. It's the single best investment for preserving your workspace. Failing that, a piece of hardboard will do, but steel is better.
3. Lighting
Poor lighting is the fastest route to eye strain, headaches, and shoddy work. Don't rely on the ceiling light. You need direct, adjustable task lighting. The gold standard is an LED bench lamp with an articulated arm. You're looking for two key numbers:
- Colour Temperature: 5000K. This is a bright, neutral daylight equivalent. It doesn't cast a yellow (warm) or blue (cool) hue, so you see the true colour of your metals and stones.
- Colour Rendering Index (CRI): 90+. This measures how accurately the light reveals colours. A high CRI is non-negotiable for assessing stone colour or the finish on a piece of metal.
A good anglepoise-style lamp allows you to move the light exactly where you need it, eliminating shadows as you work around a piece. It's as important as your saw frame.
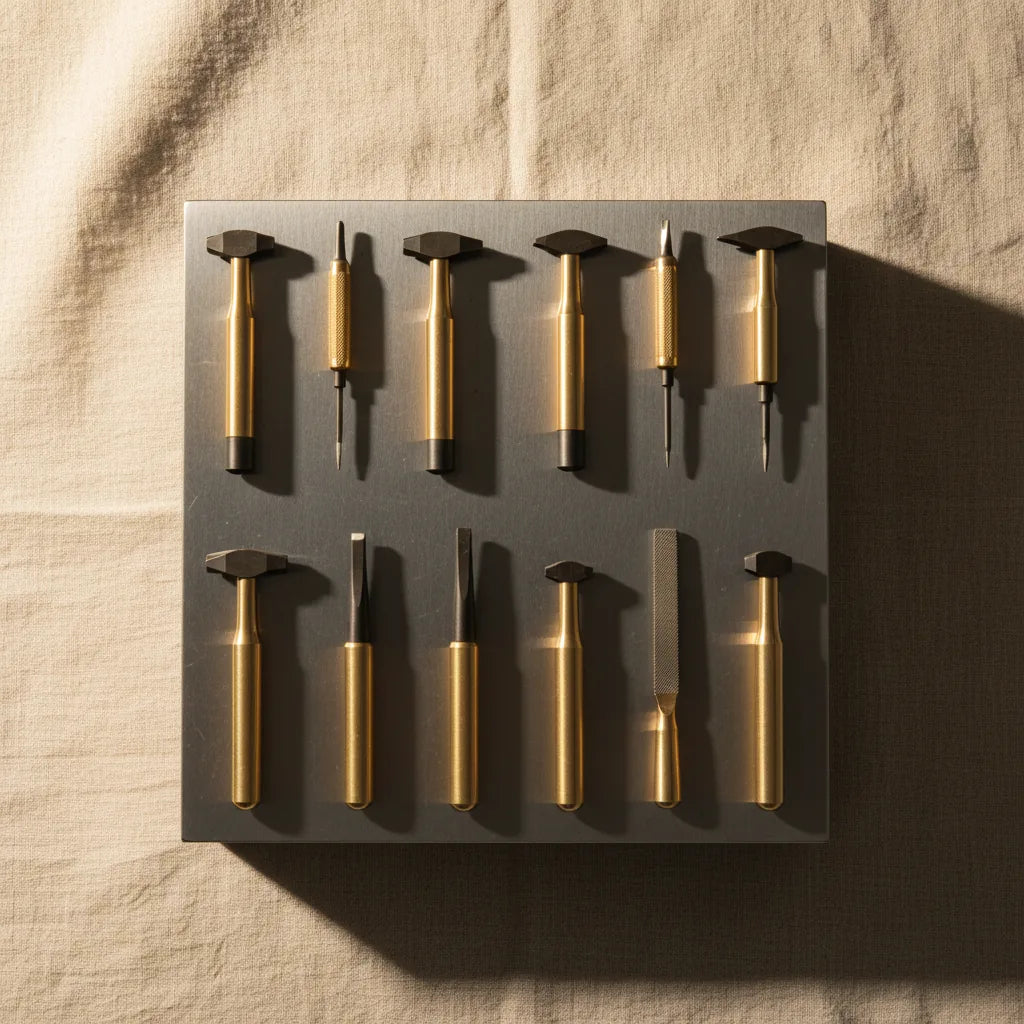
The Foundation Eight: Your First Core Tools
Tool catalogues can be overwhelming. Here are the eight bench jeweller starter tools that will handle the vast majority of your initial projects, from sawing a pendant to forming a simple ring. The philosophy here is to buy the best quality you can afford for the tools that touch the metal.
-
Jeweller's Saw Frame: A German-made adjustable frame with an 80mm throat depth is the industry standard for a reason. It's rigid, well-balanced, and will last a lifetime. Pair it with good quality Swiss-made Vallorbe or Antilope saw blades; start with a pack of size 2/0, which is a versatile all-rounder.
-
A Set of Three Needle Files: You live and die by your files. A cheap file will skip, clog, and leave a terrible finish. Start with a set of three essential 16cm needle files in a Cut 2 (a medium-fine cut): flat, half-round, and three-square (triangular). Glardon Vallorbe are the benchmark, but Friedrich Dick files offer excellent Swiss-made quality for a slightly lower price.
-
A Rawhide Mallet: For shaping rings on a mandrel or flattening sheet without marking or hardening the metal. A 32mm face diameter is a good, versatile starting size. It's a consumable tool—you'll replace the rolled-up rawhide head eventually—but a good one will last for years.
-
A Ball Pein Hammer: The quintessential jeweller's hammer. The flat (pein) face is for planishing and general forming, while the ball end is for texturing and riveting. A model with a 19mm or 22mm face is a great starting point. As you can read in our guide to choosing your first jeweller's hammer, the weight and balance are what matter most. You'll find a range of excellent options in our Hammers & Forming collection.
-
A Set of Three Pliers: Don't use DIY shop pliers; their serrated jaws will mar your metal instantly. You need smooth-jawed jeweller's pliers. Start with the essential trio: chain nose (for general purpose holding and bending), round nose (for forming loops and curves), and flat nose (for making angular bends and holding flat components). Our guide to choosing your first jewellery pliers goes into more depth on brands and jaw shapes. Find your first set in the Pliers & Cutters collection.
-
A Steel Ring Mandrel: A tapered steel rod used to form, shape, and size rings. Get a solid, hardened steel one. It's worth paying for one that is clearly engraved with UK ring sizes (A-Z). It will function as both a sizing gauge and a miniature anvil. We cover the different types in our guide to choosing a ring mandrel. Browse our selection in the Mandrels & Sizing collection.
-
A Pair of 'AA' Tweezers: These fine-pointed, stainless steel tweezers are your heat-proof fingers. You'll use them for positioning solder pallions, picking up tiny components, and quenching hot metal. They are not for plucking eyebrows. Get a non-magnetic, anti-acid pair. They cost less than a fiver and are utterly indispensable. You'll find them alongside other essentials in our Tweezers & Soldering collection.
-
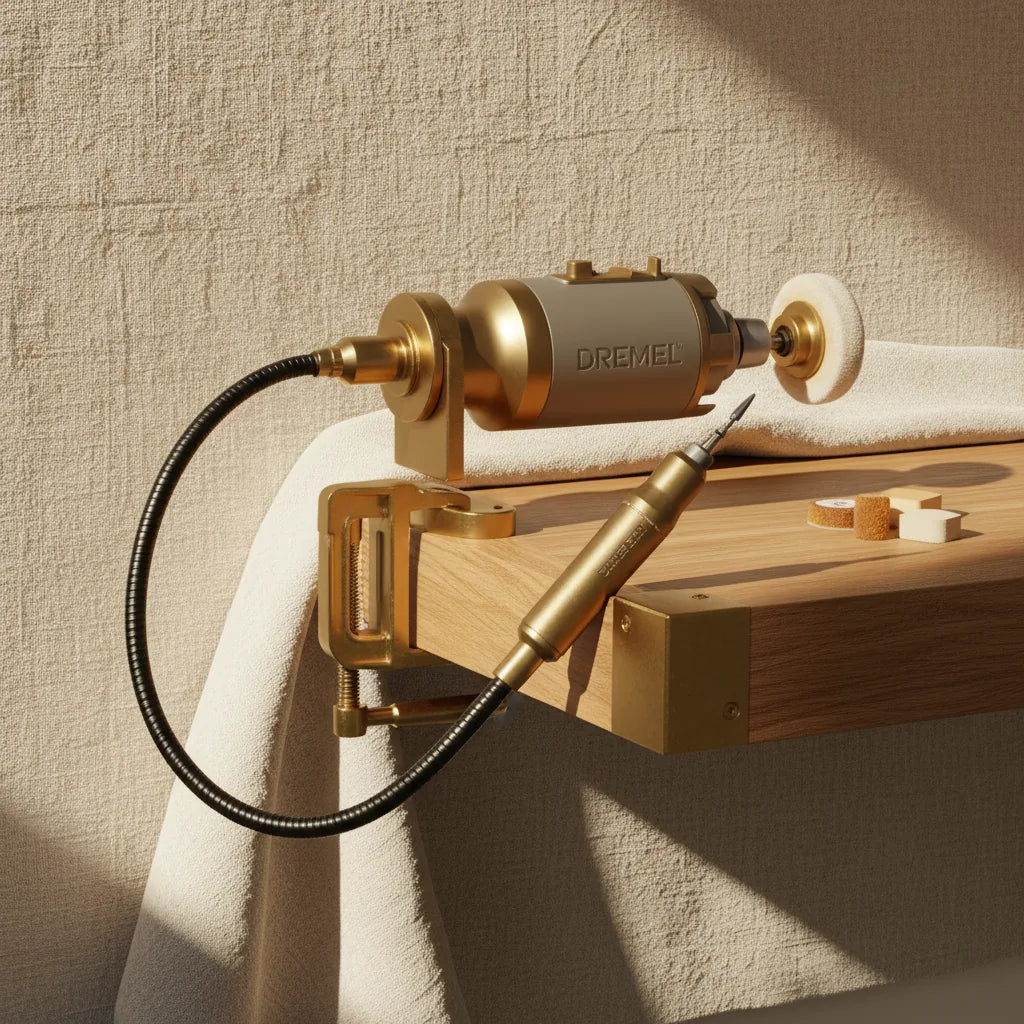
A Hand Torch: For soldering silver, you need a torch that gets hot enough, quickly. A simple butane canister torch from a hardware shop won't cut it. A refillable butane torch like the Dremel Versaflame is a decent, affordable start for small items. A better option is a Sievert-style torch that connects to a disposable propane canister. It provides a much hotter, more stable flame, giving you greater control for a modest increase in price.
The Five Tools to Avoid in Year One
Just as important as what to buy is what not to buy. These five tools are expensive, take up space, and are unnecessary for a beginner. They solve problems you don't have yet.
- A Rolling Mill: This is a huge investment (£700+). You need one when you start alloying your own metal or wanting to texture large sheets. Until then, buy your sheet and wire from a supplier like Cooksongold in the dimensions you need.
- A Polishing Motor: A big, double-spindled motor is fantastic, but it's a major expense and a health and safety commitment (dust extraction is vital). For your first year, a Dremel or a Foredom-style pendant motor with a set of polishing mops and compound will give you an excellent finish on a much smaller budget and footprint.
- A Full Set of Dapping Punches: A set of 24 dapping punches looks impressive, but you'll probably only use two or three of them. Cheap sets are often poorly finished and will mark your metal. Buy individual, good-quality punches as and when a project demands a specific dome size.
- An Ultrasonic Cleaner: A fantastic tool for cleaning finished, polished pieces, especially those with complex galleries or stone settings. But for now? A bowl of hot water, a drop of washing-up liquid, and an old toothbrush will remove polishing compound just fine.
- A Plating Kit: Plating is a specialist field of electrochemistry. It involves hazardous chemicals and requires a dedicated, well-ventilated area. Master the arts of fabrication and finishing in silver, gold, and copper before you even consider adding a layer of another metal on top.
Budgeting Your Setup: £300, £600, and £1000
This is where the rubber hits the road. These are realistic budgets for your jewellery bench essentials, assuming you've already sourced a second-hand desk. Prices are approximate and based on good quality, reputable brands.
The £300 "Student" Setup
This is the bare-bones, no-frills kit. The focus is on quality where it matters most: the things that cut and shape.
- Bench & Light: Clamp-on Bench Peg (£25), LED Anglepoise Lamp (£40)
- Hand Tools: German Saw Frame (£20), Vallorbe Blades (£5), 3x F.Dick Needle Files (£35), Rawhide Mallet (£20), Ball Pein Hammer (£25), 3x Basic Pliers (£40), Steel Ring Mandrel (£30), AA Tweezers (£5)
- Soldering: Dremel Versaflame Torch (£45), Fire Brick (£10)
- Total: approx. £300
The £600 "Apprentice" Setup
This budget allows for significant upgrades in quality and efficiency across the board. You're buying tools that will last well into your professional career.
- Bench & Light: Upgraded GRS-style Bench Peg System (£80), high-CRI LED Lamp (£70)
- Hand Tools: German Saw Frame (£20), More Saw Blades (£10), 6x Vallorbe Needle Files (£75), Fretz or Peddinghaus Hammer (£65), 3x Lindstrom Pliers (£90), Graded UK Ring Mandrel (£45), Steel Bench Block (£30)
- Soldering: Sievert Pro Torch Kit (£80), Charcoal Block (£15), Basic Pickle Pot (£20)
- Total: approx. £600
The £1000 "Serious Starter" Setup
This is a professional-level starting point for someone planning to sell their work. It introduces a key piece of machinery that dramatically speeds up finishing.
- All of the £600 "Apprentice" setup, plus:
- Finishing: Foredom SR or Dremel Fortiflex Pendant Motor Kit (£350-£400)
- Additional Hand Tools: A set of ring-bending pliers (£35), a disc cutter for perfect circles (£60)
- This budget builds a workshop, not just a bench. It's a serious investment that pays dividends in speed, quality, and the range of techniques you can employ.
Your bench is an extension of your hands and your mind. Set it up thoughtfully, invest in good tools that feel right, and it will serve you well for decades. It's not a race to acquire the most equipment; it's a gradual process of building a collection of tools you trust. Our recommendations are our own; you can read about our editorial standards here.
For a closer look at the hammers and forming tools we've discussed, you can browse our curated Hammers & Forming collection.