
The hardest part of learning to solder at home is not the soldering technique. It's that you have three things to do simultaneously — hold the workpiece steady, direct the torch, watch the solder flow — and only two hands. Beginners try to manage with a tweezer in one hand and a torch in the other and then realise they have nowhere to put the solder pick. Three minutes later the piece has shifted, the solder hasn't taken, and you're starting over.
The fix is set-up, not skill. A properly-configured hands-free soldering station means the workpiece holds itself, the torch and pick are both in your hands, and you can actually pay attention to the solder. This guide is how I set up student benches in the first week: the layout, the kit, the safety rules, and the specific order to assemble everything so you can be soldering your first piece within an hour.
This is the practical companion to Cross-lock vs reverse-action tweezers. If you haven't yet figured out which tweezers to buy, start there.
The non-negotiables before you light a torch
Three safety requirements I will not budge on. Don't start soldering at home if any of these are missing:
1. A heat-proof, non-flammable bench surface. A standard wooden bench will char where you set hot charcoal blocks or place pieces fresh out of the pickle. I keep a 0.8 mm stainless steel sheet (1 m × 0.5 m) over the bench top in my soldering area — heat-proof, easy to wipe, cheap from any sheet-metal supplier. A few ceramic floor tiles, butted together, work equally well and look more bench-like.
2. Ventilation. Soldering flames consume oxygen and produce fumes (flux fumes especially are unpleasant). At minimum, an open window with airflow. Ideally, a small extraction fan venting outside, sited behind the soldering point so the air pulls away from your face. The HSE's guidance on torch-based metalwork in small workshops is worth a read — short version: never solder in a sealed room.
3. A fire extinguisher within arm's reach. A small CO₂ or dry-powder extinguisher, rated for class B (flammable liquids — covers gas), mounted within an arm's reach of the bench. £25 from any UK trade supplier. Hopefully you never use it. The other 95% of UK bench fires that did need an extinguisher are recorded in the British Fire Service's small-workshop statistics; I won't speculate but you do not want to be a statistic.
If any of these are missing, stop reading and address them first. Everything else is comfort and productivity.
The kit list (build order)
I'm listing these in the order I'd buy them on a starter budget. Below £200 total for the whole list at our price points.
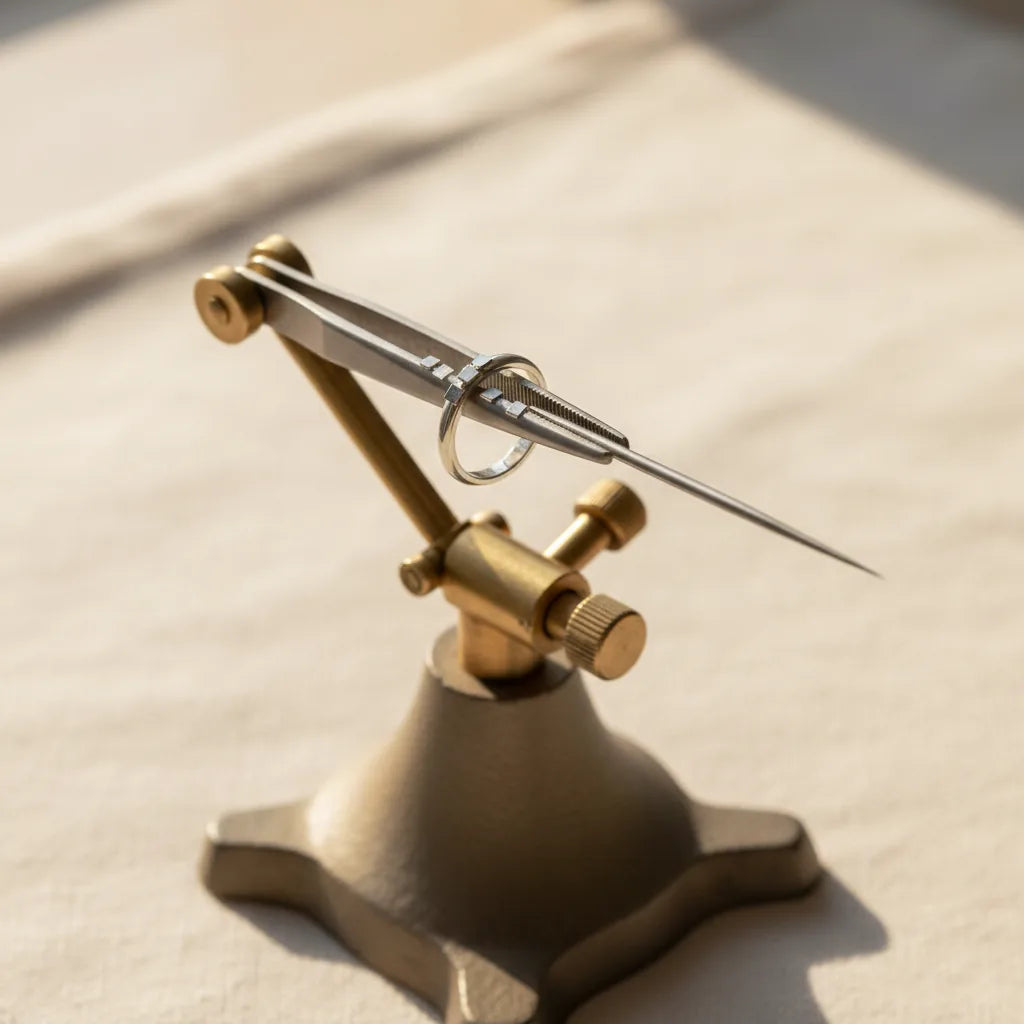
1. A heavy third-hand base
This is the centerpiece of the station — the platform that holds your cross-lock tweezer (and therefore your workpiece) at an adjustable angle while you work two-handed with the torch and pick.
Two options:
- Heavy-duty third-hand base with double clamp — double clamp arms, takes two tweezers if your operation needs them. Heavier base, more stable.
- Heavy-duty third-hand helping tool with square base — single clamp, smaller footprint. Better for tight benches.
For a starter setup, the double-clamp is more flexible — you can hold the workpiece in one tweezer and a second tweezer for managing solder positioning if needed. Buy the single-clamp version only if you literally don't have room.
2. A charcoal block holder
The charcoal block does the actual heat-reflective work — but a bare charcoal block on a steel sheet slides around mid-operation. The 120 × 50 mm anti-magnetic stainless charcoal block holder is the right size for benchwork. Anti-magnetic stainless means hot steel filings don't get dragged into your join — which matters for cleaner solder flow.
The block sits in the holder; the holder sits on the heat-proof bench surface; everything is stable.
3. Cross-lock soldering tweezers (× 2)
The workhorse tweezers that go into the third-hand. Use two so you can hold the main workpiece in one and pre-clamp a second piece (a setting, a wire, a finding) in the other, ready to swap in.
The fibre-grip cross-lock with stand is the basic version. If you can stretch the budget, the 8" anti-magnetic Japanese steel soldering tweezers is the long-term investment — they outlast multiple cheaper tweezers.
4. A titanium soldering pick set
For positioning solder, moving the workpiece, nudging things into place during the heat phase. The 3-piece titanium pick set in red/blue/yellow gives you three colour-coded picks. Dedicate each to one solder grade (hard / medium / easy) so you never accidentally introduce a lower-temperature solder into a higher-temperature join — that's the most common cause of failed multi-stage solders for beginners.
5. A ring-holding tweezer
For ring shanks specifically, the small ring-holding tweezers 6" (13×13 mm) clamps a ring securely with the join exposed for the torch. Doesn't replace the cross-lock — different jaw geometry for a different job.
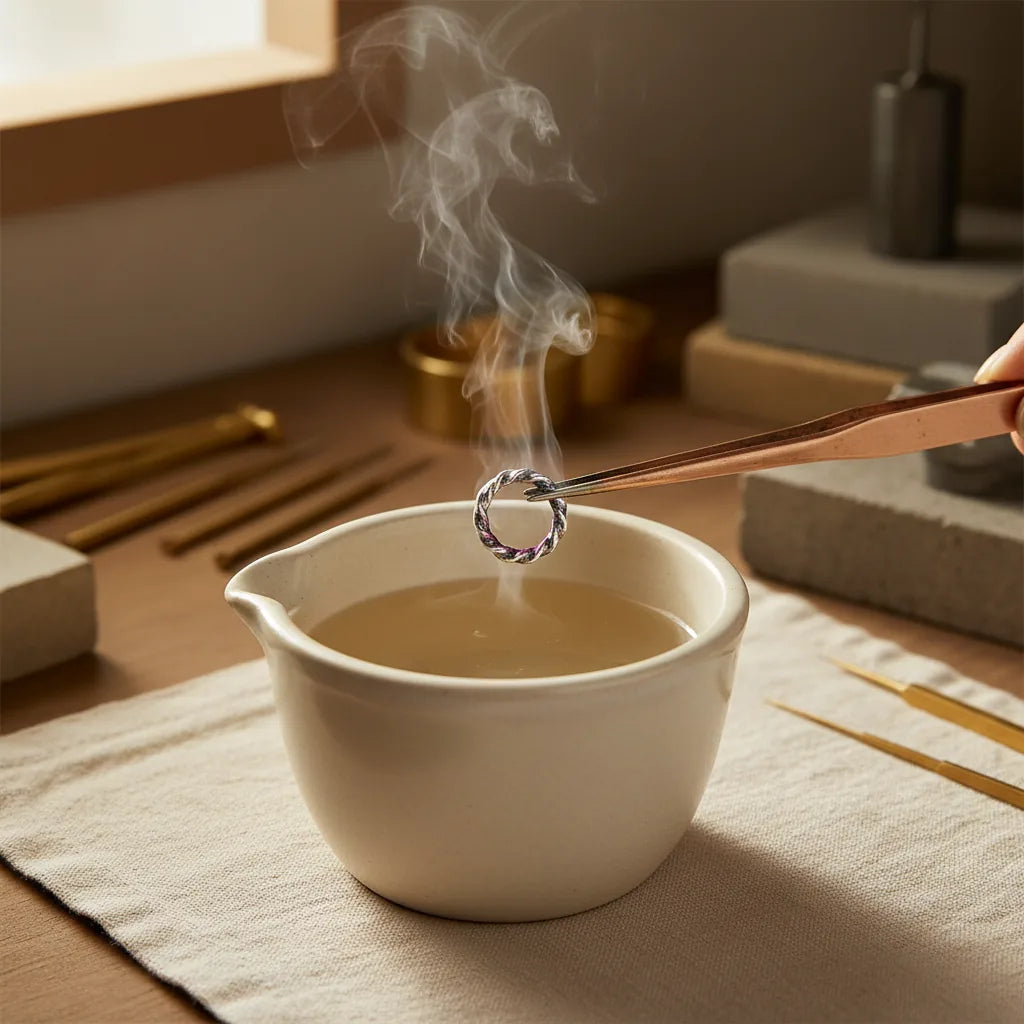
6. Copper pickling tweezers
For retrieving hot pieces from the pickle bath without contaminating the pot. The copper pickling tweezers 8.5" curved is what we use. Never substitute with steel — it'll plate copper onto every piece in the pickle pot.
7. A torch (sourced separately)
We don't currently stock torches. For UK buyers, your options are:
- Cookson Gold's Sievert torch kit (~£90 including hose, regulator, head): the trade-standard butane/propane setup. Refillable, sturdy, lasts decades.
- A 1300 °C culinary butane torch (~£20 from a kitchen supplier): adequate for sterling silver up to 1.5 mm. Won't handle heavier work or large pieces but a good starting torch.
For your first six months, a culinary butane torch is genuinely fine. Upgrade to Sievert when you start working larger pieces or doing volume.
8. A pickling pot + safety pickle
A small ceramic crockpot (£15 from any UK kitchen-supplier site) holds 250 ml of pickle warmed to ~60 °C. Safety pickle (sodium bisulphate, sold as "Cookson Sparex" or generic in the UK trade) costs about £8 per 1 kg pack and lasts months. Hot pickle dissolves firescale off freshly-soldered pieces in 2–5 minutes; cold pickle takes 30+ minutes.
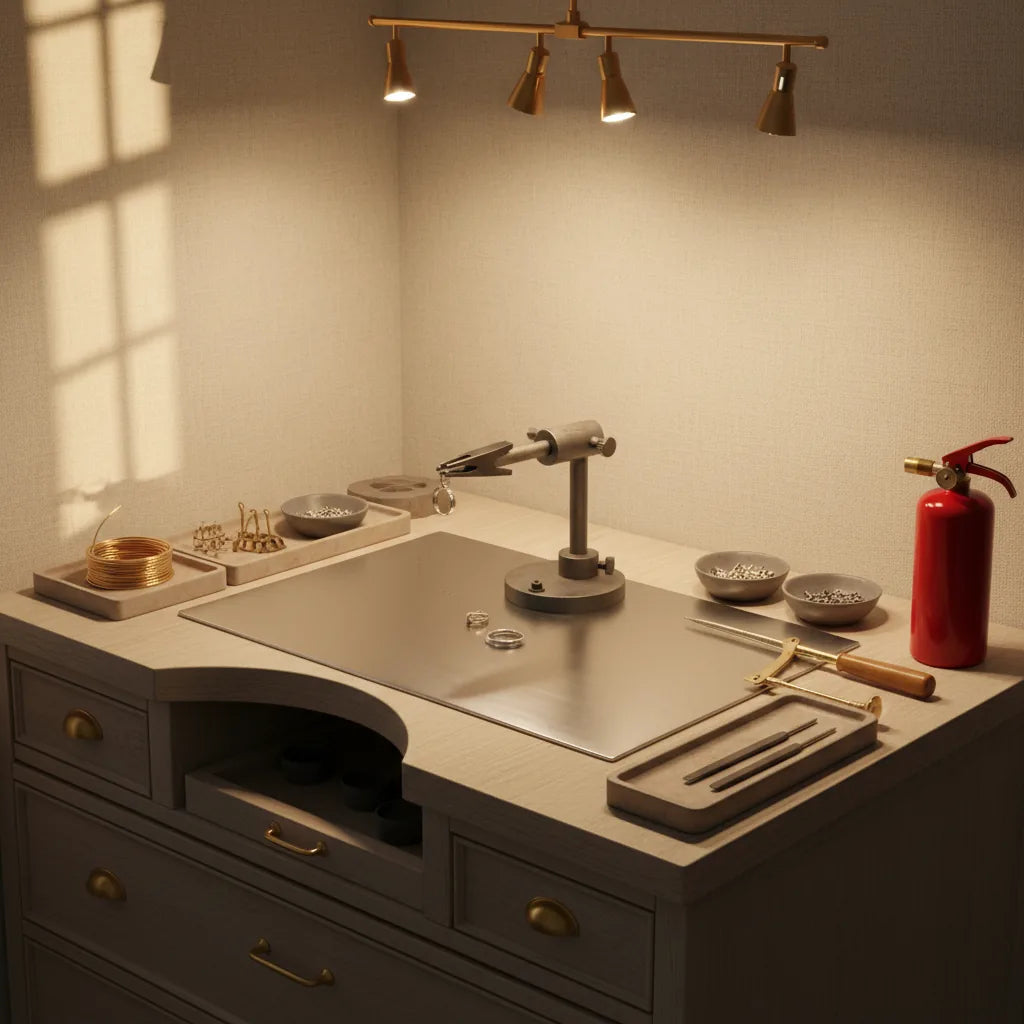
Bench layout: where each thing goes
Setup matters as much as kit. A bench with all the right tools in the wrong positions is barely better than no setup at all.
The layout I teach (and use):
- Bench centre: the heavy third-hand base with workpiece held in its cross-lock tweezer.
- Bench centre-front, just below the third-hand: charcoal block in its stainless holder. Workpiece naturally sits over the block when the third-hand is angled forward 30°.
- Bench right (or left if you're left-handed): pickle pot, positioned so you reach forward and slightly away — never directly in your peripheral vision while you're using the torch. Hot pickle plus accidental flame contact equals a bad afternoon.
- Bench left (your non-torch side): titanium soldering picks in a small block of cork or foam to keep them upright and visible.
- Bench far right: torch, with the hose running to a wall-mounted gas cylinder if you're using a Sievert, or a butane refill canister in a safe spot if you're using a culinary torch.
- Bench edge, within reach: fire extinguisher, mounted not laid down.
The key principle: everything you need during a soldering operation is reachable without standing up, and everything hot or dangerous is on the side of your dominant hand (you reach across with the less coordinated hand to grab the workpiece; you reach naturally with the dominant hand for the torch).
A first solder run-through
To put the kit through its paces, here's the operation I have students do as their first hands-free solder:
-
Bend a 2 cm length of round 1 mm sterling silver wire into a circle. The ends should meet roughly square — file flat if needed.
-
Mount the circle in the cross-lock tweezer, with the join positioned at the top edge of the jaws (so the flame can reach it cleanly).
-
Place the cross-lock in the third-hand base. Angle the workpiece so the join sits about 5 mm above the centre of the charcoal block.
-
Flux the join with paste flux (a small dab on a brush).
-
Cut a small paillon of hard silver solder (1.5 mm × 1.5 mm square). Place it across the join using the titanium pick.
-
Light the torch with a soft blue-cored flame.
-
Heat the WHOLE piece from below first, brushing the flame in slow passes. The flux bubbles, then settles. Heat continues — the silver darkens, then goes through grey, then dull orange.
-
Direct the flame at the solder paillon for the last 1–2 seconds. The solder flashes silver and flows along the join — bright as mercury, instantaneous.
-
Remove the flame. Wait for the glow to fade. Drop into the pickle with the copper tweezers.
-
Wait 3 minutes. Rinse. Inspect the join under bright light.
This sequence takes a beginner 4–5 minutes the first time, and 60–90 seconds by the tenth attempt. The hands-free setup is what makes that progression possible.
The five home-bench mistakes that catch beginners
1. Insufficient ventilation. Within an hour of starting, the room will smell strongly of flux. Within two, you'll have a headache. Open the window properly, or — better — add an extraction fan. Long-term flux exposure isn't acutely dangerous but it's unpleasant and unnecessary.
2. Charcoal block too low. New jewellers tend to put the block flat on the bench and angle the third-hand to reach it. Then the torch flame has to angle down, into the bench, where heat reflects back at the operator. Raise the block instead — put the stainless holder on a small wooden riser if needed. Aim is to have the flame nearly horizontal in use, not angled down.
3. Trying to heat the solder directly. The solder doesn't melt because the flame is hot enough; it melts because the workpiece is hot enough to draw the solder into the join. Always heat the work, not the solder. Beginners point the flame at the paillon and wonder why the solder balls up and rolls off.
4. Wrong pickle temperature. Cold pickle (room temperature) takes 20–30 minutes to dissolve firescale and might never finish. Hot pickle (~60 °C, just below simmering) does the same job in 2–5 minutes. Use a small ceramic crockpot — never an open flame to heat pickle, the fumes get aggressive.
5. Soldering through interruptions. A multi-step solder operation is a continuous flow once you've heated the workpiece. Don't try to stop and answer a phone call halfway through. The piece cools, the flux burns away, the join contaminates, and you have to start over. Block out 30 minutes of uninterrupted bench time per soldering session.
Frequently asked
Can I solder on a wooden bench without a steel sheet?
No. Even a single dropped paillon or a hot piece briefly set down will char the wood and create a smoke risk. The steel sheet (or floor tile) is non-negotiable. Cost is £15–£25, one-time.
How loud is a jeweller's torch?
A culinary butane torch: barely audible, like a hair dryer at low setting. A Sievert propane torch: noticeably louder, similar to a small gas stove flame at full. Hearing protection isn't required at jewellery bench scale.
Do I need a fume extractor or is a window enough?
For occasional soldering (a few hours a week, sterling work), a well-ventilated room with open window is acceptable. For daily soldering, especially with lower-temperature lead solders or pickling fumes, a small extraction fan with outdoor venting is genuinely worth it. £40–£100 depending on size.
Can I solder safely with kids or pets in the house?
Yes, if you have a dedicated room with a closed door during soldering, ventilation, and a clear "no entry" rule while the torch is lit. Kids of any age should not be in the same room as an open torch flame, full stop. Pets — keep them out until the bench has cooled and pickle is covered.
How much space do I need for a hands-free soldering setup?
Minimum 60 × 90 cm of bench surface, plus arm-room on all sides. The kit itself fits on a single A4-sized piece of bench; the surrounding clearance is for safety and ergonomics.
Where to go next
If you've got the setup, the next thing to practise is the actual soldering technique. How to anneal and forge silver at the bench covers the heat-and-metal fundamentals; from there it's about hours of bench time on small pieces.
Browse the Tweezers & Soldering collection for the full kit — most of what you need to build a complete station is on that page.
— K.