
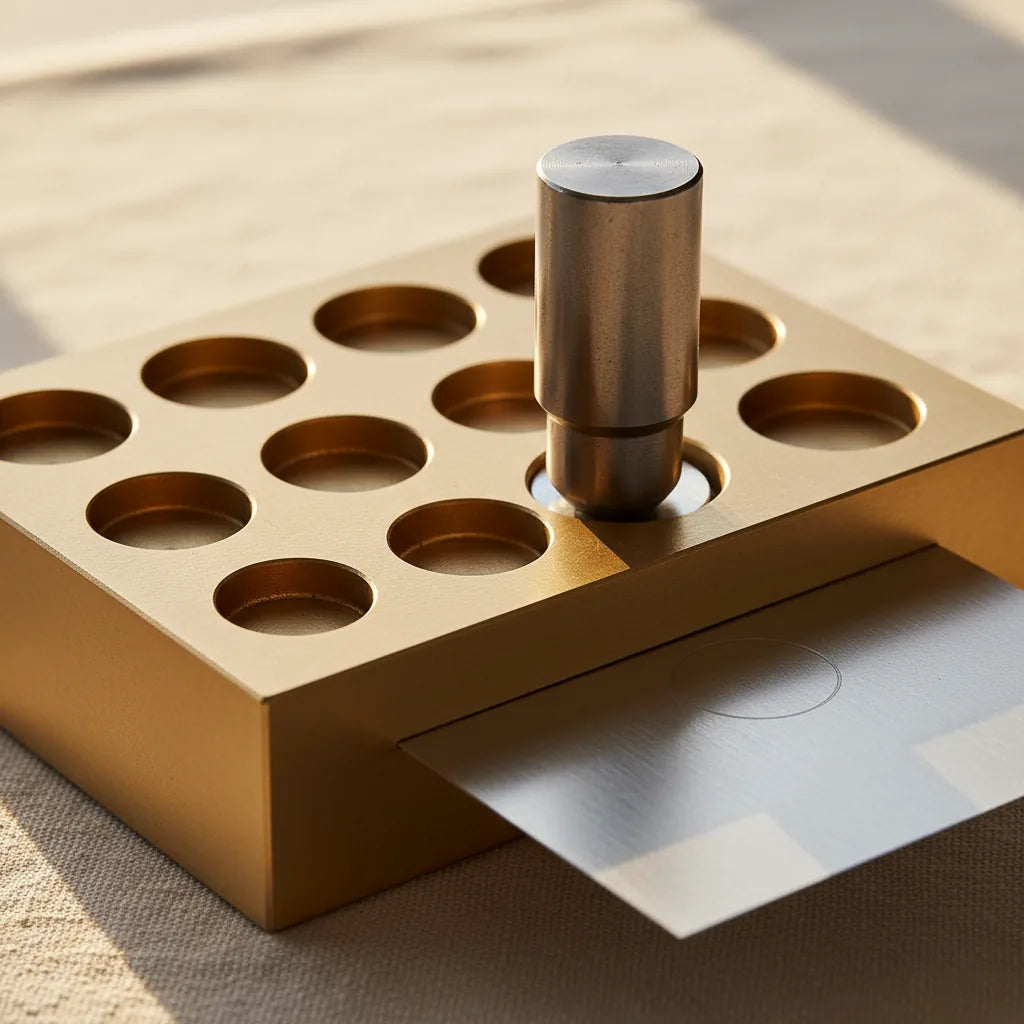
A disc cutter is one of those tools that looks more complicated than it is. The first time you see one — a heavy steel block with shaped cavities and a row of matching punches — it looks like industrial equipment. In practice it's the fastest way to produce clean, repeatable blank shapes from sheet metal, and it's a workshop investment that pays back over thousands of pieces.
This guide explains what a disc cutter set actually does, what the size ranges (7–21 mm and similar) practically mean in finished-piece terms, the difference between round, geometric, and shaped sets, and where to focus your purchase if you can only afford one cutter to start. Pair this with Choosing your first jeweller's hammer — disc cutters and hammers are used together for nearly every blanking operation.
Browse the Punches & Stamps collection with this in hand.
How a disc cutter actually works
A disc cutter consists of two parts: the die block (a heavy hardened-steel plate with shaped cavities cut through it) and a set of punches (hardened-steel rods sized to fit each cavity exactly).
To use:
- Place a sheet of annealed silver, copper, or brass over the cavity you want.
- Insert the corresponding punch from above.
- Strike the punch with a heavy hammer (or a brass mallet for softer setups).
- The punch drives the metal through the die cavity, shearing it cleanly along the cavity edge.
The result: a perfectly shaped blank, identical to every other blank you've cut from that cavity, with clean edges that need minimal filing. The British silversmithing trade has used the same basic design for over a hundred years.
What makes a good disc cutter:
- Hardened steel block — not just heat-treated mild steel. Look for "tool steel" or specifically Rockwell C58+ hardness. Soft blocks deform around the cavity edge after a few hundred strikes and produce ragged blanks.
- Polished cavities — the cavity inner walls should be mirror-smooth. Rough cavity walls drag the metal as it passes through, leaving streak marks on the cut edge.
- Properly fitting punches — the punch should slide freely into the cavity but not loosely. A loose fit lets the punch tilt during the strike, producing angled cuts.
- Properly hardened punches — soft punches mushroom over their working face within a few hundred strikes. Same hardness rule as the block.
The single biggest difference between a £30 disc cutter and a £100 one is whether the steel was properly hardened post-machining. Cheap cutters look identical out of the box; six months in, the cheap ones have visibly mushroomed punches and worn-edge cavities.
Size ranges: what 7–21 mm actually gives you
Disc cutter sets are typically described by their cavity diameter range. The most common ranges, and what they map to in finished-piece terms:
Small range (1–5 mm or 3–13 mm)
For tiny blanks — accent discs, granulation seeds, small jump rings, layered pendant components. The 7-hole metal round disc cutter set, 3–13 mm is the standard small-range cutter. Use it for components, not for finished standalone pieces.
Medium range (7–22 mm)
This is the workhorse range — the diameters that produce most finished standalone jewellery components: pendant blanks, earring fronts, ring shoulder accents, layered medallion sets. If you can only own one disc cutter, this is the range to target.
Our 6-piece flower shape disc cutter, 7–22 mm covers it for floral pieces; the 9-shape geometric set, 7–21 mm gives you a mix of round, oval, hexagonal, teardrop, and crescent in the same diameter range.
Large range (15–30 mm+)
For larger components — full-size statement pendants, cuff-style bracelet sections, large medallion bases. Less common in starter kits because these blanks consume more silver per piece.
Geometric vs shaped sets: what you actually need
Two philosophies in disc cutter design:
Round / geometric sets
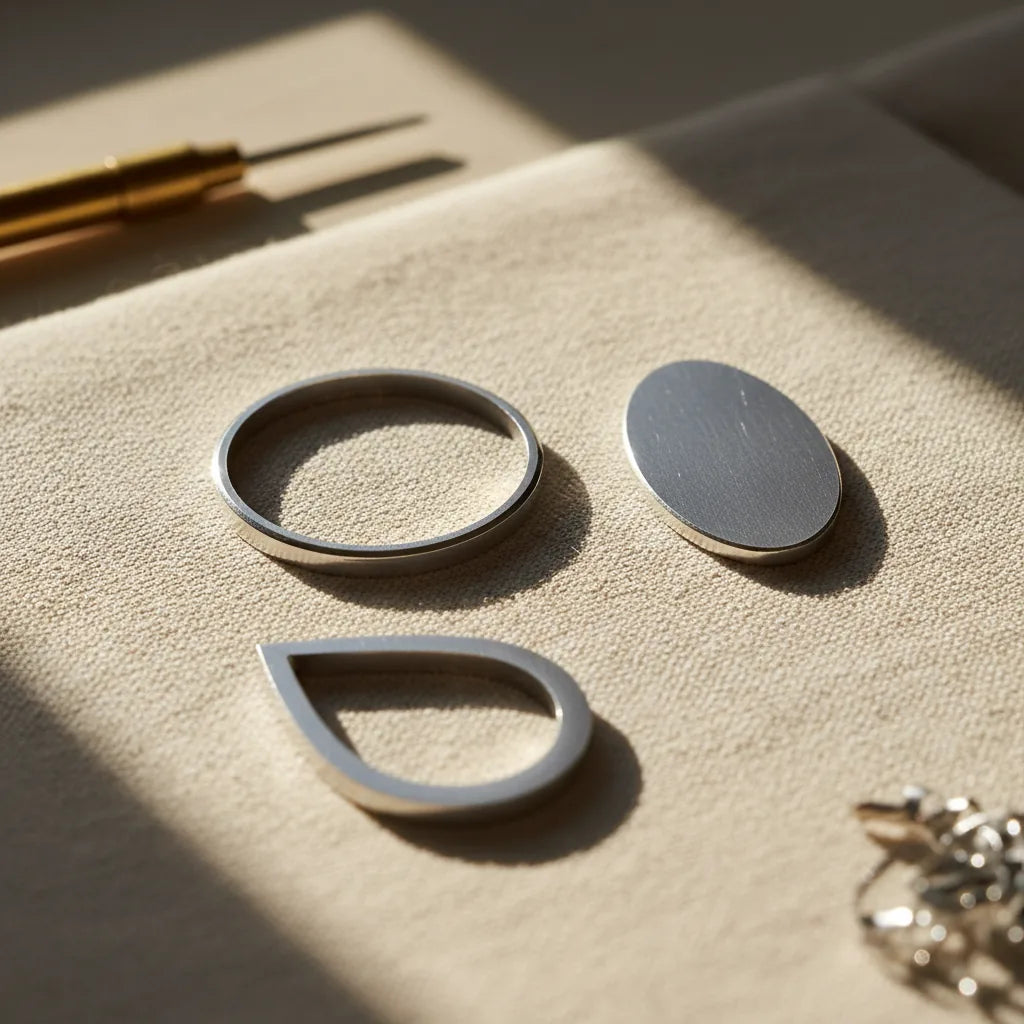
The traditional disc cutter is a set of round cavities at incrementing diameters — 3, 5, 7, 9, 11, 13 mm. Round blanks are the building block of most jewellery: domed earrings, sleeve discs, layered pendants, bezel cup bases. You'll cut hundreds of round blanks per year.
Modern "geometric" sets extend this to include hexagons, ovals, teardrops, crescents, triangles — all simple shapes that aren't decorative on their own but are component-friendly. The 9-shape geometric set is the right choice if your style is contemporary, architectural, or repeats simple shapes.
Shaped / decorative sets
Sets where the cavity is shaped like a finished design element — hearts, flowers, leaves, stars. These produce decorative blanks that are recognisable shapes in their own right. Useful for:
- Production work where you need 50 identical hearts for a sellable line
- Beginner-friendly pieces (a cut heart is "done" — no further forming needed)
- Stamped components that get layered with other blanks
The heart-shape disc cutter, 5 sizes 8–20 mm is the most-used shaped cutter we stock — heart shapes sell consistently in finished work, and the size range covers small accent through statement-pendant scale.
The trade-off: shaped cutters are more specific to a single design style. A flower-shape cutter is great if you make floral jewellery; if your style is architectural, those flower blanks go unused.
Mixed-shape sets (the compromise)
Sets with one or two of each shape — useful if you're still developing your style and want to try shapes before committing to a dedicated set. Generally fewer pieces per shape than dedicated single-shape sets.
What I'd buy first
In priority order for a new bench:
-
A 7–13 mm round disc cutter — covers 80% of bench needs for component work. If you only buy one, this is it.
-
A 7–22 mm geometric or shaped cutter — adds the larger-format blanks for standalone pieces. Choose by your design style: geometric for architectural / contemporary, shaped for figurative / decorative.
-
An oval-shape cutter set — ovals are the underestimated shape; they read as "ring-shaped" or "stone-shaped" in a way rounds don't. The oval steel disc cutter, 7 sizes 4–16 mm is worth adding once you have the rounds.
-
A hole punch pliers — for tiny pierce-through holes in already-finished pieces (chain attachment points, small embellishments). The 1.5 mm hole punch pliers is faster than setting up a disc cutter for a single small hole. The parallel-action 2×2 mm square hole punch is a specialty version for square pin-style holes.
-
A heavy stamping hammer — you need one. The 1.75 lb square head stamping hammer is the dedicated tool for driving disc cutter punches. A regular chasing hammer is too light; a sledgehammer is overkill. The 1.5–2 lb stamping hammer is the sweet spot.
How to actually use a disc cutter (the technique that prevents most failures)
The technique matters more than the tool quality:
1. Anneal the sheet first. Hard sheet cuts ragged. Anneal to soft state (How to anneal and forge silver covers this) before any disc cutting. The cut quality difference is night-and-day.
2. Place the cutter on a heavy steel surface or a hardwood block. Cutting onto a flat-faced anvil works. Cutting onto a wooden bench surface ruins the bench and risks pinching the punch as the block flexes.
3. Position the sheet over the cavity. Allow at least 2 mm margin on all sides. If you're working at the edge of your sheet, you risk a partial cut and a torn blank.
4. Insert the punch. Push it firmly so it sits in the cavity, not on the sheet surface. The bottom face of the punch should be touching the sheet.
5. Strike confidently. One firm hammer blow. Hesitant taps are worse than a confident hit — they tear the metal rather than shearing it. For 0.8 mm sheet, one solid blow with a 1.5 lb stamping hammer is enough.
6. Remove the punch. It may need a light tap from below if the metal grips it.
7. Pop the blank out. Should drop freely from the cavity. If it sticks, the cavity has worn and is no longer cylindrical — replace the cutter.

Disc cutter maintenance
Disc cutters need almost no maintenance, but the small jobs that exist matter:
After every session: wipe the cavities clean with a soft cloth. Any silver scraps left in a cavity will mar the next blank's edge.
Monthly: light oil on the punches to prevent rust. The cavities are usually self-protected from oxidation by their hardness, but the punch shafts can rust if left dry in a humid workshop.
As needed: if a punch shows visible mushrooming on the working face, polish it back to flat with fine emery paper. If the cavity rim shows visible chipping or roundedness, the cutter has reached end-of-life — replace.
Never:
- Cut hard / work-hardened sheet (anneal first)
- Strike with the punch slightly tilted (the cavity will gradually elongate)
- Use the cutter without a heavy steel or hardwood backing
Frequently asked
What thickness of metal can a disc cutter handle?
0.5 mm to 1.2 mm is the practical range for most jewellery-scale disc cutters. Thinner sheet may tear at the cavity edge; thicker sheet requires more force than a hand-swung hammer reliably produces. For thicker stock, blanking with a jeweller's saw is the alternative.
Can I cut copper, brass, and silver with the same cutter?
Yes — the cutter is harder than any of these alloys. Anneal each properly before cutting and you'll get clean blanks regardless of metal.
Why do my blanks have a rough edge on one side?
The metal sheet shears in one direction relative to the punch. The side facing the punch is sheared cleanly; the side facing the cavity bottom may have a tiny burr. Position the sheet so the side you want flush is facing the punch (i.e. the punch shears down through the sheet).
How many strikes per blank?
One. If you need to strike twice, the punch is tilted, the cavity is worn, or your metal is too hard. Re-anneal and try again with a confident single strike.
Are disc cutters worth it for occasional hobby use?
Yes — even at 5 pieces per year, the time saved per blank vs sawing pays back. A disc cutter blank takes 30 seconds; a sawed blank of the same shape takes 5–10 minutes including filing the edge.
Where to go next
Start with the 7–13 mm round disc cutter and the 1.75 lb stamping hammer. Those two cover the everyday blanking needs. Add a shaped cutter (hearts, geometric multi-shape) once you've worked out which shapes recur in your design vocabulary.
The next post — Stamping your maker's mark cleanly, every time — covers the closely-related skill of using stamp punches to mark your work consistently.
— K.